
What you'll need:
(I use a nail oil first but you don't have to)
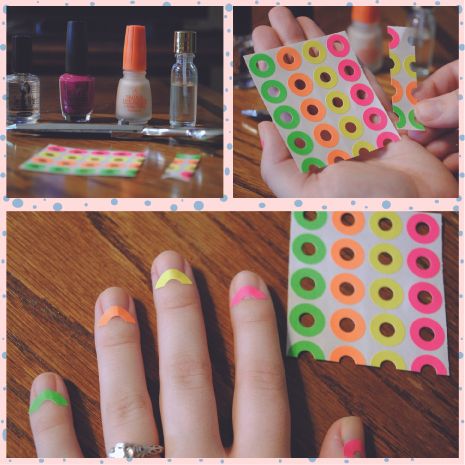
a base coat
the color of choice
a top coat
hole punch enforcers (found at Walmart but you can get them any where)
nail polish remover
cue tips
1. Put the base coat on and let it dry well. Then cut the little stickers in half (I like to cut them in half because it makes them more manageable) and put them at the base of the nail on both hands.
I put them fairly high up because I like a little bit bigger half moon, but if you wanted a more subtle half moon just make sure they are further down.
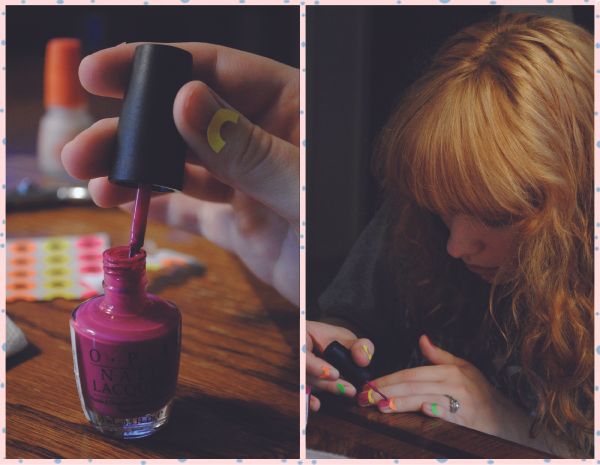
2. Paint on two nice thick coats of your color.
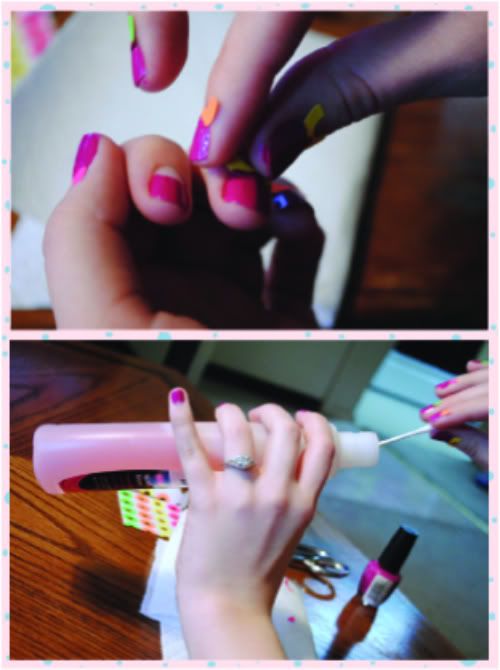

4. After you've cleaned them up put a nice top coat on and TA DA! You have a lovely half moon manicure.
If you want to put on a complimentary color underneath just put a coat on before you put the stickers on, but make sure the polish is super dry before you put the stickers on or they will pull off the color.
xo,
Em
Super loving it!
ReplyDeletexx
I LIKE IT FAST
This is a fab idea, I am going to try this one! Thanks for sharing :)
ReplyDeletexx
rebelrousher.blogspot.com
Great idea!!
ReplyDeleteI'm following you!! And you? :)
Thanks for stopping by my blog! :) Really! :)
kiss,yumiKo
yumikontheworld.blogspot.com
Oh this looks cool :D
ReplyDeleteThanks for dropping by my blog.
You have a lovely blog ♥
http://www.thechao5.blogspot.com
Great tutorial! I've been longing to try this for so long!
ReplyDeletehttp://myfashioninsider.blogspot.com/
adorei! no momento estou com unhas de joaninha! Adorei o blog, você é linda. beijo
ReplyDeleteThanks for this tutorial! I've been wanting to try this for a while but had no idea how. I can't wait to try this later.
ReplyDeleteI love your blog, too. Consider me a new follower :)
I have been dying to try the half moon! Thanks for the tips!
ReplyDeleteAnd how gorgeous are you? Love your style!
Thank you so much for stopping by just fab and leaving lovely comments!
Cheryl
I wish I had the patience to do this, it always comes out so lovely :)
ReplyDeleteoooo! Very cool!
ReplyDeletethis is so pretty! i will give it a try!
ReplyDeletethank you for your sweet comment! =)
Okay sooo love this! What a great idea I've been trying to figure out this manicure forever!
ReplyDeleteAwesome!!! I am definitely trying this....
ReplyDeleteJulie Del @ J.Bird
i MIGHT just have to try this! what a cool idea! :) thanks for the inspiration!
ReplyDeletexx
Hole punch enforcers! That's what I meant when I was trying to explain it! Hehe.
ReplyDeleteI love this look, I'll have to try it out soon! Thank you for the great tutorial~ ♥
OMG! nice idea =)) I will try it.. am a new follower here.. check out my blog and follow me too if you like =))
ReplyDeletehttp://sittieinthecity.blogspot.com
Thanks for sharing!! <3 Gonna try it one day :)
ReplyDeleteI'm following your blog :D
ReplyDeletewow cute post!!
ReplyDeletethanks so mch for your comment!
if u want we can follow each other!!
have a great day!
www.thecurlylady.blogspot.com
you have such LOVELY outfits...
ReplyDeleteyes the HALF MOON is so COOL
CHANEL actually brought to trend while showcasing their models on the runway:)
do drop by my BLOG at
http://street-chic-blahhhhh.blogspot.com/
tata xoxoxo
This is really great! I tryed it once, long long time ago, but I think I should definitely do it again! :)
ReplyDeleteGreat blog! Following from now on! ;)
xx,K.
if i had nails i would do this. :P
ReplyDeletebut, my fingers are short and chubby..
wonderful tutorial though!!!
love the half moon manicure! looks great!
ReplyDeletexx
def gonna try it!
ReplyDeleteI'm going to try this. So simple - I love it!
ReplyDeleteI will do it one day, it's really pretty !
ReplyDelete:)
thankies, Em! :D
ReplyDeletexoxo
This is fabulous! Thanks for the tips, I am going to try it out.
ReplyDeletep.s, thanks so much for your lovely comments on my blog. would you like us to follow each other?
http://alexandriajz.blogspot.com
I'm SO head over heels for the half moon manicure, looks like a definite must try. AND I'm smitten with your ring, it looks like an antique, just lovely. xx veronika
ReplyDeleteAwe, so cute! Great idea. Thank you for the sweet comment!
ReplyDeletexo, Elsie
Awesome DIY! I really feel like painting my nails for the fist time in years now ^^ although I don't own any nailpolish... x
ReplyDeleteTHOSE ARE SO....CUTE! thanks for stopping by!!!! I'm following you now....follow back??
ReplyDeleteChari T (deep fried stilettos)xx
Looks great! I need to work on my patience--I have such a hard time waiting for polish to dry.
ReplyDeleteSo cute! Definitely want to try this! along with home-painted leopard print nails! :)
ReplyDeletebrea-marie.blogspot.com
What an adorable look! Thanks so much for sharing this! I will definitely try it!
ReplyDeletefantastic nails! you did a great job. im absolutely loving your blog, and style, will follow you :)
ReplyDeletenatalie
http://lucyandtherunaways.blogspot.com
this is fantastic, should try it soon:D
ReplyDeleteJournal J
thanks for the comment! great tutorial, im definitely going to try this
ReplyDeletehttp://www.woodenheartbeat.blogspot.com/
that is so cute! I have to try it one day! :D
ReplyDeleteawesome post..i have to try this soon!
ReplyDeletefollowing you now ;)
Thanks for this great tutorial! I can't wait to try it! xoxo
ReplyDelete